Highly Available L7 Load Balancing for Exchange 2013 with HAProxy – Part 2 - Deploy and configure the PKI infrastructure (this page)
Highly Available L7 Load Balancing for Exchange 2013 with HAProxy – Part 3 - Configure and test the Exchange 2013 Client Access role
Highly Available L7 Load Balancing for Exchange 2013 with HAProxy – Part 4 - Install CentOS 7
Highly Available L7 Load Balancing for Exchange 2013 with HAProxy – Part 5 - Install and configure HAProxy
Highly Available L7 Load Balancing for Exchange 2013 with HAProxy – Part 6 - Make HAProxy highly available
Highly Available L7 Load Balancing for Exchange 2013 with HAProxy – Part 7 - Demo
In Part 1 I described the test lab for the HAProxy solution. In this part we’ll install the certificate servers. This part is comprised of these main sections:
- Initial configuration.
- Install the AD-CA role.
- Configure the Root CA.
- Configure the CDP and AIA on the Root CA.
- Configure the Intermediate CA.
- Import the Root CA Certificate to LAB-CA02.
- Issue and Import the Intermediate CA certificate.
- Configure the CDP and AIA on the Intermediate CA.
Initial Configuration
LAB-CA01 and LAB-CA02 are freshly installed workgroup computers in vanilla state. All we've done so far is that we renamed them and configured the IP settings. Therefore we must explicitly configure the following:
Add lab.local as primary domain suffix on LAB-CA01 and LAB-CA02.

Create Forward lookup DNS HOST records for LAB-CA01 and LAB-CA02 in the lab.local DNS zone.

Install the AD-CA Role
This step is straight forward and it is no different from installing other roles. We need to install both the Certificate Authority and Certification Authority Web Enrollment role services on both LAB-CA01 and LAB-CA02 servers. I assume you know how to install a role, so no additional details here.

Configure the Root CA
Once the AD-CA role is installed on LAB-CA01, we need to configure it. From the notification area, start the AD-CS configuration wizard.

On the Credentials page click Next to use the default LAB-CA01\Administrator credentials.

On the Role Services page tick both the Certificate Authority and Certificate Authority Web Enrollment boxes then click Next.

On the Setup Type page Standalone CA should already be selected. The Enterprise CA type is only available if the server is domain-joined. This is a workgroup server, therefore the Enterprise CA is not an option. Click Next.

On the CA Type page select Root CA and click Next.

On the Private Key page select Create a new private key and click Next.

On the Cryptography for CA page accept the default settings (RSA#Microsoft Software Key Storage Provider, Hash algorithm: SHA1, Key length: 2048) and click Next.

On the CA Name page set the common name to Lab-Root-CA and click Next.

On the Validity Period page set the validity to 20 years. Although we don’t need this CA to last that long, it closely mimics a real life deployment.

On the CA Database page accept the default and click Next.

On the Confirmation page review the settings and click Configure.

Wait for the configuration to complete. On the Results page confirm that things have been successful and click Close.

By default the validity of certificates issued by the CA is 1 year only. Since the root CA issues certificates for the intermediate CA only, 1 year is usually too short. Therefore we want to set it to something longer, such as 5 years. The following commands confirm that the current (default) setting is 1 year, then we set it to 5 years, followed by a service restart. Then we confirm that the change has taken effect.
certutil -getreg ca\validityperiod
certutil -getreg ca\validityperiodunits
certutil -setreg ca\validityperiodunits "5"
net stop certsvc && net start certsvc
certutil -getreg ca\validityperiodunits
certutil -getreg ca\validityperiodunits
certutil -setreg ca\validityperiodunits "5"
net stop certsvc && net start certsvc
certutil -getreg ca\validityperiodunits

More about certificate validity period can be found in the Microsoft KB281557 knowledge base article.
Configure the CDP and AIA on the Root CA
Once the root CA configuration is complete, open the Certificate Authority management console. In the navigation pane right-click on Lab-Root-CA and click Properties.

In the Lab-Roor-CA Properties, on the Extensions tab, select the CRL Distribution Point (CDP) extension. In the list underneath click to highlight the http distribution method, then click the following checkboxes:
- Include in CRLs. Clients use this to find Data CRL locations.
- Include in the CDP extensions of issued certificates.

While still in the Extensions tab, select the Authority Information Access (AIA) extension. In the list underneath click to select the http distribution method, then select the “Include in the AIA extension of issued certificates” checkbox. Click Apply.

We then click Yes to restart the AD-CS service.

Configure the Intermediate CA
The process is very similar to the one configuring the root CA with a few exceptions. From the notification area, start the AD-CS configuration wizard.

On the Credentials page click Next to accept the default credentials, LAB-CA02\Administrator.

On the Role Services page select the Certification Authority and Certification Authority Web Enrollment checkboxes and click Next.

On the Setup Type page select Standalone CA. This too is a workgroup computer. Click Next.

On the CA Type page select Subordinate CA and click Next.

On the Private Key page select Create a new private key and click Next.

On the Cryptography for CA page select the default (RSA#Microsoft Software Key Storage Provider, hash algorithm: SHA1, key length: 2048) and click Next.

On the CA Name page set the common name to Lab-Intermediate-CA. Click Next.

On the Certificate Request page select Save a certificate to a file on the target machine. Accept the default file name of C:\LAB-CA02.lab.local_lab-LAB-CA02-CA.req and click Next.

On the CA Database page accept the default and click Next.

On the Confirmation page review the settings and click Configure.

Wait for the process to complete. Confirm that the configuration was successful and click Close. Please note that the warning next to Certification Authority is expected because we do not yet have a certificate issued for this CA. This being an intermediate CA, its certificate must be issued by an upstream CA, in this case by our root CA on LAB-CA01.

Import the Root CA Certificate to LAB-CA02
At this point, on LAB-CA02 we need to import the root CA certificate into the local computer’s certificate store.
First we need to export the root CA certificate. Log on to LAB-CA01 and open the Certification Authority management console. Right-click Lab-Root-CA and click Properties.

On the General tab of the Lab-Root-CA Properties dialog click View Certificate.

In the Certificate dialog, on the Details tab click Copy to File.

In the Certificate Export Wizard, on the Welcome to the Certificate Export Wizard page, click Next.

On the Export File Format page select DER encoded binary X.509 (.CER) and click Next.

On the File to Export page select a file to export the certificate to. In my lab I exported it to C:\Temp\RootCA.cer.

On the Completing the Certificate Export Wizard page, click Finish.

Click OK to acknowledge and dismiss the result dialog, then close all windows.
Copy the exported certificate to LAB-CA02.
We are now ready to import the root CA certificate to the Trusted Root Certification Authorities store of the LAB-CA02 server.
On LAB-CA02, open the Certificates MMC snap-in and target the local computer account store. Right-click the Trusted Root Certification Authorities node, click All Tasks, then select Import.

On the Welcome to the Certificate Import Wizard page of the Certificate Import Wizard, click Next.

On the File to Import page select the exported root CA certificate that’s been transferred from LAB-CA01. In my lab it is C:\Temp\RooCA.cer.

On the Certificate Store page ensure that the Trusted Root Certification Authorities store is selected and click Next.

On the Completing the Certificate Import Wizard page click Finish.

Click OK to acknowledge and dismiss the result dialog, then close all windows.

Back in the Certificates MMC console, confirm that Lab-Root-CA is now a trusted root CA.

Issue and Import the Intermediate CA certificate
Now we are ready to issue and install the intermediate CA certificate.
Remember, when we configured LAB-CA02 earlier in this part, we saved the certificate request file to C:\LAB-CA02.lab.local_lab-LAB-CA02-CA.req on LAB-CA02. Copy this file to LAB-CA01. Once the file has been copied, log back on to LAB-CA01 and open the Certification Authority MMC console. Right-click Lab-Root-CA, click All Tasks, then select Submit new request.

In the Open Request File dialog select the LAB-CA02.lab.local_lab-LAB-CA02-CA.req file transferred from LAB-CA02 and click Open.

Back in the Certification Authority console, click the Pending Requests node. You’ll see our new pending request in the list. Right-click it, then in the All Tasks menu select Issue.

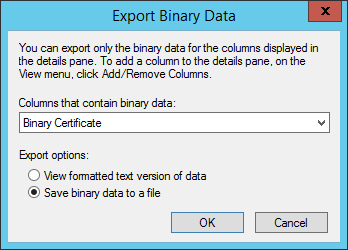
Back in the Certification Authority console, click the Issued Certificates node. You’ll see the newly issued certificate in the list. Right-click it, then in the All Tasks menu select Export Binary Data.

In the Export Binary Data dialog confirm that “Binary Certificate” and “Save binary data to a file” are selected and click OK.
In the Save Binary Data dialog select a location and a file name. In my lab I saved the exported certificate to C:\Temp, accepting the default name of LAB-CA02.lab.local_lab-LAB-CA02-CA.crt. You can give it any name you like.

Copy the exported file to LAB-CA02.
We now need to install the intermediate CA certificate. Back to LAB-CA02, open the Certification Authority MMC console. Right-click the Lab-Intermediate-CA node and in the “All Tasks” menu select “Install CA Certificate”.

Select the intermediate CA certificate that we issued and transferred to LAB-CA02. In my lab the file is C:\Temp\LAB-CA02.lab.local_lab-LAB-CA02-CA.crt. Click Open.

When complete, right-click Lab-Intermediate-CA, and in the “All Tasks” menu select “Start Service”.

Our intermediate CA is now functional, although we need to configure its CDP and AIA distribution to make it fully functional.

Configure the CDP and AIA on the Intermediate CA
On LAB-CA02, in the Certification Authority MMC console, right-click Lab-Intermediate-CA and click Properties.

On the Extensions tab select the CRL Distribution Point (CDP) extension, then click the HTTP entry in the locations list. Select the “Include in CRLs” and “Include in the CDP extension of issued certificates” checkboxes.

Select the Authority Information Access (AIA) extension, then click the HTTP entry in the locations list. Select the “Include in the AIA extension of issued certificates” checkbox. Click Apply when done.

When prompted, click Yes to restart the AD-CS service.

Our intermediate CA will issue server certificates, in particular the SAN certificate for our Exchange 2013 servers. Therefore we do not need to change the validity period for issued certificates as the default of 1 year is quite common and perfectly acceptable for the purpose of this lab.
We now have a fully functional, fully configured PKI infrastructure that mimics a real life, commercial PKI in that it has a root CA, an intermediate CA, it has realistic validity periods and it is not AD integrated. Can things be done better or differently? Absolutely, but that's not the focus of this lab.
This concludes Part 2.
In the next part we will configure the Exchange 2013 CAS roles and some mail flow an other aspects of our Exchange servers, then we’ll request, install and assign a SAN certificate using our new CA infrastructure.
Highly Available L7 Load Balancing for Exchange 2013 with HAProxy – Part 1 - Introduction and lab description
Highly Available L7 Load Balancing for Exchange 2013 with HAProxy – Part 2 - Deploy and configure the PKI infrastructure (this page)
Highly Available L7 Load Balancing for Exchange 2013 with HAProxy – Part 3 - Configure and test the Exchange 2013 Client Access role
Highly Available L7 Load Balancing for Exchange 2013 with HAProxy – Part 4 - Install CentOS 7
Highly Available L7 Load Balancing for Exchange 2013 with HAProxy – Part 5 - Install and configure HAProxy
Highly Available L7 Load Balancing for Exchange 2013 with HAProxy – Part 6 - Make HAProxy highly available
Highly Available L7 Load Balancing for Exchange 2013 with HAProxy – Part 7 - Demo
No comments:
Post a Comment