Highly Available L7 Load Balancing for Exchange 2013 with HAProxy – Part 2 - Deploy and configure the PKI infrastructure
Highly Available L7 Load Balancing for Exchange 2013 with HAProxy – Part 3 - Configure and test the Exchange 2013 Client Access role
Highly Available L7 Load Balancing for Exchange 2013 with HAProxy – Part 4 - Install CentOS 7
Highly Available L7 Load Balancing for Exchange 2013 with HAProxy – Part 5 - Install and configure HAProxy (this page)
Highly Available L7 Load Balancing for Exchange 2013 with HAProxy – Part 6 - Make HAProxy highly available
Highly Available L7 Load Balancing for Exchange 2013 with HAProxy – Part 7 - Demo
In Part 4 we installed and configured CentOS 7. We enabled remote SSH access for root (bad-bad, but hey, it’s a lab!) and downloaded Putty and WinScp. In this part we aim at having a fully configured HAProxy server. We will install certificates (again), download HAProxy source files, then compile and install HAProxy from source and create the configuration file. Finally we'll do some basic testing.
This article is organised into the following sections:
- Brief HAProxy certificate primer
- Update the root and intermediate certificates store
- Upload the Exchange certificate and private key
- Download, install and configure HAProxy
- Create the haproxy.conf file
- Enable syslog logging
- Start HAProxy automatically
- Configure the firewall
- Testing
HAProxy will bridge SSL connections between clients and Exchange. It acts as the SSL endpoint for the client. It receives SSL-encrypted communication from the client, decrypts it, analyses it and makes routing decisions based on rules that we configure. Since HAProxy appears to the client as the Exchange server and therefore it will be responding to client requests on URLs that have been configured on Exchange virtual directories, in order for the communication to be trusted and therefore possible, HAProxy must encrypt communication with the Exchange servers’ private key, and present a valid certificate with all the right common name and SAN names just as an Exchange server would. In fact it pretends to be the Exchange server, the client has no idea that in fact it talks to a proxy or load balancer. For this reason we must install the Exchange server certificate and its associated private key on the HAProxy servers.
Additionally, we don’t do SSL offloading. That is, traffic between HAProxy and Exchange will be encrypted also. As a side note, SSL offloading wasn’t originally supported in Exchange 2013, but it is now. HAProxy will pass on traffic on the clients’ behalf to the Exchange servers, and it is expected that the response, traffic that’s SSL-encrypted by the Exchange servers, will be understood by HAProxy. For HAProxy to understand this traffic, it must be able to decrypt the communication that’s been encrypted by Exchange. It can only do it if it trusts the CA that issued the Exchange servers’ certificate. Since the Exchange servers’ certificate was issued by our own internal PKI, there is no way in the world that any certificate issued by our root or intermediate CAs will be trusted out of the box. Therefore we must also install the root and intermediate CAs’ certificates on the HAProxy servers.
Now that we understand why we need to go through this ordeal, let’s get moving. By the way, even if you acquire a certificate from a commercial CA, there are no guarantees that its intermediate and root CA certificates will come pre-canned with CentOS 7 (or any Linux flavour as a matter of fact), so it is good to know the procedure anyway, just in case.
Update the Root and Intermediate Certificates Store
Log in to lab-hap01 via Putty. We’ll ascertain that encrypted communication between HAProxy and Exchange isn’t possible (yet). For this we use curl:
curl https://mail.digitalbrain.com.au/owa
Please note the response: “Peer’s certificate issuer is not recognised.” Yes, we must install our root and intermediate CAs’ certificates. No easy way out

In my lab I used WinScp to transfer my root and intermediate CAs’ certificates to the root home directory. These are the same files that we transferred to the Exchange servers and LAB-WS01 and imported into the Trusted and Intermediate CA stores in Part 2:

Since I don’t want to litter the root folder of my home directory, I created a “certificates” folder and moved the certificates there (I could have used WinScp to move them there in the first instance, but for some unknown reason I didn’t):
mkdir certificates
mv *.cer certificates/
mv *.cer certificates/
These .cer files are our root and intermediate CAs’ certificates, and if you followed this lab to the letter then they are in C:\Temp of LAB-EX01 and LAB-EX02. There is a twist though: since in Linux I use command line, and I really dislike typing a lot, I renamed the original files to root.cer (formerly RootCA.cer) and intermediate.cer (formerly LAB-CA02.lab.local_lab-LAB-CA02-CA.cer). I used the ls command to make sure that files are moved around as expected. ls is the equivalent of the DOS dir command.

What the screenshot shows:
- mkdir certificates creates the certificates folder in root’s home folder.
- mv *.cer certificates/ moves all .cer files from the current location (~root) to the certificates folder.
- ls *cer –l lists the current folder. “No such file or directory” confirms that our certificates were moved.
- cd certificates moves us into the certificates folder.
- ls *.cer –l confirms that our certificates are now in the certificates folder.
openssl x509 -in root.cer -inform der -outform pem -out root.pem
openssl x509 -in intermediate.cer -inform der -outform pem -out intermediate.pem
openssl x509 -in intermediate.cer -inform der -outform pem -out intermediate.pem

Now we re-hash our certificates. You'll find a good tutorial here, and more on the c_rehash perl script here. This is why we needed the openssl perl module back in Part 4. Once re-hashed, we use the cat command to concatenate the new hash symbolic links to the ca-bundle.crt file, which, effectively, is the certificate store for root and intermediate CAs.
c_rehash . (don’t miss the trailing dot)
cat 4b37341f.0 >> /etc/pki/tls/certs/ca-bundle.crt
cat 5bb23659.0 >> /etc/pki/tls/certs/ca-bundle.crt
cat 4b37341f.0 >> /etc/pki/tls/certs/ca-bundle.crt
cat 5bb23659.0 >> /etc/pki/tls/certs/ca-bundle.crt

Now that we have loaded our PKI’s CA certificates, let’s test again:
curl https://mail.digitalbrain.com.au/owa
This time we get a completely different response: our request is redirected to the OWA login page (notice the path change to “/owa/auth/logon.aspx”), which, while in the output of this simple text-based browser doesn’t make much sense, indicates that curl now trusts our Exchange servers’ certificate. We are doing well!

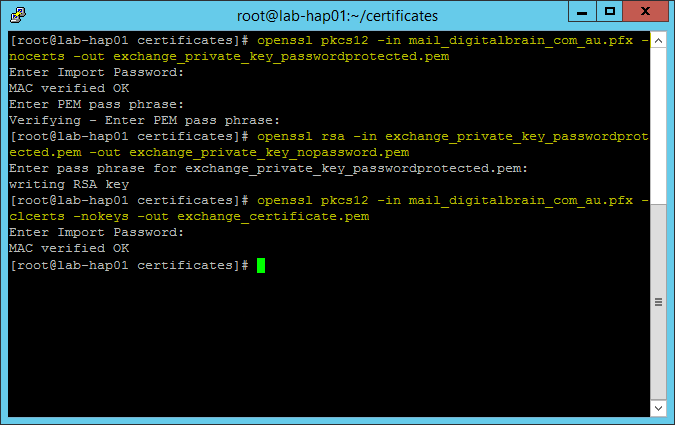
Upload the Exchange Certificate and Private Key
We now need to upload the Exchange certificate and private key. There is some massaging that still needs to happen, so please be patient.
We use WinScp to upload the mail_digitalbrain_com_au.pfx file to the ~root/certificates folder. This is the same file that we exported our Exchange certificate to when we transferred it from LAB-EX01 to LAB-EX02 back in Part 3. If you followed this lab to the letter then you'll find it in C:\Temp on LAB-EX01. The ~root/certificates folder is the same where we moved our PKI CA certificates to earlier in this part. So we copied the Exchange pfx certificate to ~root/certificates. We can use the ls –l command to confirm that our pfx file is there:
ls -l

Now we need a couple of conversions, extractions and combinations. Here they are. First we extract the private key from the PFX file. We will be prompted for the credentials that we used when we exported the Exchange certificate.
openssl pkcs12 -in mail_digitalbrain_com_au.pfx -nocerts -out exchange_private_key_passwordprotected.pem
Then we remove the password protection from the private key. Type the password when prompted.
openssl rsa -in exchange_private_key_passwordprotected.pem -out exchange_private_key_nopassword.pem
We had to remove the password because there is no way to type it when HAProxy needs to use the private key. For this reason, the resulting private key file (exchange_private_key_nopassword.pem in this lab) would normally be properly secured so it doesn’t get compromised. This being a lab, the security of the private key is not a concern right now.
We now extract the certificate from the PFX file. We need to provide the credentials used when we exported it on LAB-EX01.
openssl pkcs12 -in mail_digitalbrain_com_au.pfx -clcerts -nokeys -out exchange_certificate.pem
At this stage we have two files of interest:
- exchange_private_key_nopassword.pem contains the (unprotected) DER encoded private key of our Exchange certificate
- exchange_certificate.pem contains the DER encoded Exchange certificate
cat exchange_certificate.pem exchange_private_key_nopassword.pem > exchange_certificate_and_key_nopassword.pem
The exchange_certificate_and_key_nopassword.pem file now contains the Exchange certificate and its (unprotected) private key. We move this file into its final place, /etc/ssl/certs/:
mv exchange_certificate_and_key_nopassword.pem /etc/ssl/certs/
Then we do some cleanup (not really necessary in this lab, but I did it anyway):
rm -f exchange*.*

We can use the ls –l command to confirm that all Exchange-related files were removed from the working directory, and the ls /etc/ssl/certs/ -l command to confirm that we have our file where it should be:

Well, let's give ourselves a pat on the shoulder, we deserve it. We are through the most difficult part, at least in my opinion, of this lab. Well done!
Download, Install and Configure HAProxy
We now head off to fetch the latest HAProxy source files and install it. The latest stable version at the time of this writing is 1.5.4. To download it, we first change directory to the root home folder, then we download the source tarball:
cd ~
wget http://www.haproxy.org/download/1.5/src/haproxy-1.5.4.tar.gz

Extract the tarball. We’ll see lots of files scrolling across the screen, so the screenshot only shows the command and the first few extracted files:
tar –zxvf haproxy-1.5.4.tar.gz

Change to the extracted files and build HAProxy. We use the TARGET, USE_PCRE, USE_OPENSSL and USE_ZLIB switches to indicate that we are using a modern Linux distro, we want built-in Perl-compatible regular expressions, built-in OpenSSL support and built-in zlib compression support:
cd haproxy-1.5.4
make TARGET=linux2628 USE_PCRE=1 USE_OPENSSL=1 USE_ZLIB=1
Now that we built HAProxy, let’s install it:
make install

At this point we have HAProxy installed, and technically ready for use (well, we still need to create a configuration file to make it fly but that’s coming).
Create the haproxy.conf file
HAProxy can only run if it knows how and what to do. It needs a configuration file to run. The configuration file is a plain text file with directives which instruct HAProxy to do what we want it to do. In this section we create and test the configuration file.
To keep things as close as possible to what’s a de facto standard, we’ll place the file into the /etc folder and will call it haproxy.conf. To set things straight: it does not need to live in /etc and it does not need to be called haproxy.conf.
Whether you create it from scratch and type it in your preferred text editor, or simply copy-paste it from this blog into a plain text file and upload it with WinSCP, it doesn’t really matter.
Here is the content of the haproxy.conf file:
global
log 127.0.0.1 local0 info
maxconn 10000
daemon
quiet
tune.ssl.default-dh-param 2048
defaults
log global
mode http
option httplog
option dontlognull
timeout connect 60000ms
timeout client 30000ms
timeout server 60000ms
timeout check 60000ms
stats enable
stats uri /stats
frontend fe_ex2013
mode http
bind *:443 ssl crt /etc/ssl/certs/exchange_certificate_and_key_nopassword.pem
acl autodiscover url_beg /Autodiscover
acl mapi url_beg /mapi
acl rpc url_beg /rpc
acl owa url_beg /owa
acl eas url_beg /microsoft-server-activesync
acl ecp url_beg /ecp
acl ews url_beg /ews
acl oab url_beg /oab
use_backend be_ex2013_autodiscover if autodiscover
use_backend be_ex2013_mapi if mapi
use_backend be_ex2013_rpc if rpc
use_backend be_ex2013_owa if owa
use_backend be_ex2013_eas if eas
use_backend be_ex2013_ecp if ecp
use_backend be_ex2013_ews if ews
use_backend be_ex2013_oab if oab
default_backend be_ex2013
backend be_ex2013_autodiscover
mode http
balance roundrobin
option httpchk GET /autodiscover/healthcheck.htm
option log-health-checks
http-check expect status 200
server lab-ex01 10.30.1.11:443 check ssl inter 15s verify required ca-file /etc/ssl/certs/ca-bundle.crt
server lab-ex02 10.30.1.12:443 check ssl inter 15s verify required ca-file /etc/ssl/certs/ca-bundle.crt
backend be_ex2013_mapi
mode http
balance roundrobin
option httpchk GET /mapi/healthcheck.htm
option log-health-checks
http-check expect status 200
server lab-ex01 10.30.1.11:443 check ssl inter 15s verify required ca-file /etc/ssl/certs/ca-bundle.crt
server lab-ex02 10.30.1.12:443 check ssl inter 15s verify required ca-file /etc/ssl/certs/ca-bundle.crt
backend be_ex2013_rpc
mode http
balance roundrobin
option httpchk GET /rpc/healthcheck.htm
option log-health-checks
http-check expect status 200
server lab-ex01 10.30.1.11:443 check ssl inter 15s verify required ca-file /etc/ssl/certs/ca-bundle.crt
server lab-ex02 10.30.1.12:443 check ssl inter 15s verify required ca-file /etc/ssl/certs/ca-bundle.crt
backend be_ex2013_owa
mode http
balance roundrobin
option httpchk GET /owa/healthcheck.htm
option log-health-checks
http-check expect status 200
server lab-ex01 10.30.1.11:443 check ssl inter 15s verify required ca-file /etc/ssl/certs/ca-bundle.crt
server lab-ex02 10.30.1.12:443 check ssl inter 15s verify required ca-file /etc/ssl/certs/ca-bundle.crt
backend be_ex2013_eas
mode http
balance roundrobin
option httpchk GET /microsoft-server-activesync/healthcheck.htm
option log-health-checks
http-check expect status 200
server lab-ex01 10.30.1.11:443 check ssl inter 15s verify required ca-file /etc/ssl/certs/ca-bundle.crt
server lab-ex02 10.30.1.12:443 check ssl inter 15s verify required ca-file /etc/ssl/certs/ca-bundle.crt
backend be_ex2013_ecp
mode http
balance roundrobin
option httpchk GET /ecp/healthcheck.htm
option log-health-checks
http-check expect status 200
server lab-ex01 10.30.1.11:443 check ssl inter 15s verify required ca-file /etc/ssl/certs/ca-bundle.crt
server lab-ex02 10.30.1.12:443 check ssl inter 15s verify required ca-file /etc/ssl/certs/ca-bundle.crt
backend be_ex2013_ews
mode http
balance roundrobin
option httpchk GET /ews/healthcheck.htm
option log-health-checks
http-check expect status 200
server lab-ex01 10.30.1.11:443 check ssl inter 15s verify required ca-file /etc/ssl/certs/ca-bundle.crt
server lab-ex02 10.30.1.12:443 check ssl inter 15s verify required ca-file /etc/ssl/certs/ca-bundle.crt
backend be_ex2013_oab
mode http
balance roundrobin
option httpchk GET /oab/healthcheck.htm
option log-health-checks
http-check expect status 200
server lab-ex01 10.30.1.11:443 check ssl inter 15s verify required ca-file /etc/ssl/certs/ca-bundle.crt
server lab-ex02 10.30.1.12:443 check ssl inter 15s verify required ca-file /etc/ssl/certs/ca-bundle.crt
backend be_ex2013
mode http
balance roundrobin
server lab-ex01 10.30.1.11:443 check ssl inter 15s verify required ca-file /etc/ssl/certs/ca-bundle.crt
server lab-ex02 10.30.1.12:443 check ssl inter 15s verify required ca-file /etc/ssl/certs/ca-bundle.crt
Now that we have HAProxy installed, certificates configured and a configuration file, we do a pre-flight test of our configuration:
/usr/local/sbin/haproxy –f /etc/haproxy.conf –c
While I will leave it in your care to study and understand the various HAProxy directives (read the HAProxy manual), I believe that some minimal explanation is in order:
- Define your own certificate in the bind directive under the frontend block.
- Define your own Exchange servers in the server directive in every backend block.
- In every backend block, define a server directive for each Exchange CAS server in your environment that you want load-balanced.
- Once you read the manual, you'll see that my timeout values are rather high. Set yours to values that make sense in your environment.
- The configuration includes a statistics uri (/stats), which instructs haproxy to gather statistics and make it available on http://mail.digitalbrain.com.au/stats. The stats page can be password protected if so desired.
HAProxy has extensive syslog logging features. You might have noticed the log directive in the haproxy.conf file, under the global section. The directive in my config file instructs HAProxy to use the syslogd facility on localhost to log information level transactions. We therefore need to configure our CentOS server to accept information from HAProxy.
Open the /etc/rsyslog.conf file in your favourite editor and un-comment the following lines:
- $ModLoad imudp
- $UDPServerRun 514

Just above the local7.* section (to keep things together in good order), type the following lines:
- # HAProxy syslog facility
- (this is only a comment, type whatever makes sense to you)
- local0.* /var/log/haproxy.log
- (this line instructs the rsyslog facility to log HAProxy events to /var/log/haproxy.log – well, there is more to it, but this is sufficient for the purpose of this lab)

Save the file and restart the rsyslog service:
systemctl restart rsyslog.service
Since logs can grow really quickly really big, we mustn’t forget about rotating them. Using your preferred text editor, create the /etc/logrotate.d/haproxy file and add the following content (credit: http://sharadchhetri.com/2013/10/16/how-to-enable-logging-of-haproxy-in-rsyslog/):
/var/log/haproxy.log {
  missingok
  notifempty
  sharedscripts
  rotate 30
  daily
  compress
  postrotate
  reload rsyslog > /dev/null 2>&1 || true
  endscript
}
Nothing needs to be restarted as logrotate is driven by a cron job.
Start HAProxy Automatically
We want HAProxy to start automatically every time the server is restarted. HAProxy comes with support for the more modern systemd service management mechanism. As part of the HAProxy install, a systemd wrapper is also installed along with the executable. The wrapper enables us to easily turn HAProxy into a service that starts every time our computer is rebooted. For more on systemd on CentOS7 see https://wiki.archlinux.org/index.php/systemd and http://www.openlogic.com/wazi/bid/351296/An-introduction-to-systemd-for-CentOS-7.
The process is easy. First we navigate to /usr/lib/systemd/system:
cd /usr/lib/systemd/system
and confirm there are no HAProxy-related files:
ls haproxy*.*

Then we use our preferred text editor to create the haproxy.service file in the /usr/lib/systemd/system folder. Mine is vi, but you can use nano, vim or anything you like.
Add the following content and save the file:
[Unit]
Description=HAProxy Load Balancer
After=syslog.target network.target

[Service]
ExecStart=/usr/local/sbin/haproxy-systemd-wrapper -f /etc/haproxy.conf -p /var/run/haproxy.pid
ExecReload=/bin/kill/ -USR2 $MAINPID

[Install]
WantedBy=multi-user.target

Symlink the new haproxy.service file to system.default to make haproxy start when the system boots:
ln -sf /usr/lib/systemd/system/haproxy.service /etc/systemd/system/multi-user.target.wants/
Configure the Firewall
One more hurdle left: by default the firewall is installed and enabled on CentOS 7. We need to allow incoming HTTPS traffic, otherwise the firewall will block communication. CentOS7 implements firewalld, therefore the commands we need to use are the following:
firewall-cmd –-add-port=443/tcp –-permanent
systemctl restart firewalld

We now need to check that the settings stick and survive a reboot, so we restart the server and check the settings:
shutdown –r now
and
systemctl status haproxy
ps –A | grep haproxy
firewall-cmd --query-port 443/tcp
Notice that the haproxy service is active (running), the haproxy processes are showing, and the firewall's response is "yes", meaning that tcp port 443 is allowed. This is good.

Testing
Time for testing. We want to know whether 1) HAProxy is actually proxying connections between a client and Exchange 2013, 2) HAProxy load-balances traffic between our two servers, and 3) HAProxy correctly detects a single dead service within a CAS server and proxies traffic to the surviving service on the other server.
We update the pinpoint zones' DNS records, pointing them to lab-hap01:

We open an OWA session to our mailbox - don't worry about the content of the Inbox, the point is that we can access the mailbox and traffic is generated, which hopefully we can analyse later:

Then we look at the HAProxy stats, in particular at the be_ex2013_owa section:

Here we'll see a couple of noteworthy features:
- LAB-EX01 and LAB-EX02 are both listed and green, meaning that haproxy knows about both servers the OWA service is responsive on both of them. Service level health check is one of THE main features of our L7 load balancer.
- We only tested OWA, therefore we'll only see traffic in the OWA section of the stats. We haven't (yet) used features that would generate traffic in other sections, therefore everything else will show no traffic for now.
- Both LAB-EX01 and LAB-EX02 show roughly the same amount of traffic, which means that our load balancer is doing its job.
Set-ServerComponentState lab-ex01 -Component OwaProxy -Requester Maintenance -State Inactive
Get-ExchangeServer | Get-ServerComponentState | ?{$_.Component -eq "OwaProxy"}
Get-ExchangeServer | Get-ServerComponentState | ?{$_.Component -eq "OwaProxy"}
The first command places the OwaProxy component into maintenance mode, thus it no longer accepts client connections. The second command confirms the inactive state of OwaProxy.

Then we browse again to our mailbox via OWA to generate some client traffic (sorry, no screenshot for this second OWA session), then we check the HAProxy stats page again:

What we see is exactly what we wanted to see:
- We only took offline the OwaProxy component on LAB-EX01. HAProxy picked up that OwaProxy is no longer responding, and marked it as unavailable - note the red stripe across LAB-EX01 under the be_ex2013_owa section.
- Other components aren't affected: they are still green on both Exchange servers. We expect HAProxy to pass traffic to all green services on all servers, including LAB-EX01 for all responsive components except OwaProxy.
- No more client traffic has been sent by HAProxy to the unresponsive service: the In/Out bytes count hasn't changed between the two screenshots for LAB-EX01, whereas the byte count increased for LAB-EX02 as a result of our second OWA session for the simulated service failure.
Set-ServerComponentState lab-ex01 -Component OwaProxy -Requester Maintenance -State Active
Get-ExchangeServer | Get-ServerComponentState | ?{$_.Component -eq "OwaProxy"}
Get-ExchangeServer | Get-ServerComponentState | ?{$_.Component -eq "OwaProxy"}

We are done with LAB-HAP01. At this point you may choose to stop here and have a single HAProxy server doing an excellent job, but without HA. However if you do need HA, (and I encourage you to go for it), then now is the time to build your second HAProxy server, LAB-HAP02. So scroll right to the top of this post and do it all over again on LAB-HAP02.
This brings us to the end of this part.
In the next part we will install and configure keepalived and will make HAProxy highly available.
Highly Available L7 Load Balancing for Exchange 2013 with HAProxy – Part 1 - Introduction and lab description
Highly Available L7 Load Balancing for Exchange 2013 with HAProxy – Part 2 - Deploy and configure the PKI infrastructure
Highly Available L7 Load Balancing for Exchange 2013 with HAProxy – Part 3 - Configure and test the Exchange 2013 Client Access role
Highly Available L7 Load Balancing for Exchange 2013 with HAProxy – Part 4 - Install CentOS 7
Highly Available L7 Load Balancing for Exchange 2013 with HAProxy – Part 5 - Install and configure HAProxy (this page)
Highly Available L7 Load Balancing for Exchange 2013 with HAProxy – Part 6 - Make HAProxy highly available
Highly Available L7 Load Balancing for Exchange 2013 with HAProxy – Part 7 - Demo
i finished the install and config of the first HAproxy, i try to login to OWA threw HAproxy but it fails.
ReplyDeleteKhalil, what is the error? Does it work if you bypass HAProxy? Did you follow the procedure to the letter? Did you use the same OS and version?
DeleteTry adding cookie option to the backends as below to OWA/ECP. This should fix the login issue you are having. This will keep users logged in during a keepalive or during a refresh. I can confirm this works on EX2013 and EX2013 SP1.
ReplyDeletebackend be_ex2013_owa
mode http
balance roundrobin
cookie SERVERID insert indirect nocache maxidle 7200s maxlife 13h
option httpchk GET /owa/healthcheck.htm
option log-health-checks
http-check expect status 200
server lab-ex01 10.30.1.11:443 check ssl cookie lab-ex01 inter 15s verify required ca-file /etc/ssl/certs/ca-bundle.crt
server lab-ex02 10.30.1.12:443 check ssl cookie lab-ex02 inter 15s verify required ca-file /etc/ssl/certs/ca-bundle.crt
Brandon, I went through the configuration a couple of times, testing it before publishing it, and it works. Before changing the configuration, it would be useful to know what the error is.
DeleteThank you for the write-up. However, none of my health checks are working, they all report that my exchange servers are down. Please see here: http://www.cfbangor.com/haproxy.png . When I navigate to https://exchangeserver/ecp/healthcheck.htm I get the OK response, but haproxy does not seem to be seeing this. Any ideas where I should look. I appreciate it.
ReplyDeleteI figured out it was nothing more than a simple typo. Your configuration works perfectly. Thank you.
DeleteAwesome. Glad you worked it out.
DeleteThis is great and works well, but what about http redirection, we need to enable port 80 so it can redirect users to https:// i.e http://domain.com will redirect to https://domain.com/owa
ReplyDeleteMatt, I am glad you found it useful. I may add this feature to the config as time permits.
DeleteMatt, I thought about it lately and I think you'll be better off handling it at the IIS level on the CAS servers. If you simply go to https://your_exchange_fqdn, the HAProxy configuration should just work. Redirection to https://your_exchange_fqdn/owa would be handled by IIS - see https://technet.microsoft.com/en-us/library/cc732969(v=ws.10).aspx. HAProxy will load-balance both the original, as well as the redirected traffic. As far as the client is concerned, it is all transparent. If you really want to do it in HAProxy then please take a look at https://www.haproxy.com/doc/aloha/7.0/haproxy/http_redirection.html, especially at Prefix Redirection and Examples section.
DeleteThis is excellent guide. I suggest adding inbound smtp load balancing to this guide.
ReplyDeleteThanks Jon, I may include it as time permits.
DeleteI had to run this to get smtp and other protocols to bind to a socket.
ReplyDeletesetsebool -P haproxy_connect_any=1
Thanks for sharing it Jon. The guide is not comprehensive and surely lacks features found in commercial products - but it's free for all to use. Any improvements are welcome, and there is certainly room for it.
DeleteThank you Zoltan for this guide. When you can add smtp settings to ghis guide?
ReplyDeleteAbout SMTP 25,How to do ?
ReplyDeleteAbout Exchange 2015,How to do ?
Thank you !
@Unknown, I am a bit snowed under for the next two months, but I'll add an update as things will quite down a bit.
ReplyDelete@JinFeng, Ex2016 should be no different.
Very good guide.
ReplyDeleteI've been playing with HAProxy for a long time now (since 2009 actually). I event met the founders of Exceliance (now HAProxy Technologies). You'll find a complete guide here, which is a refreshed version of my very first guide. I recently updated it with latest sample config file. You have everything, not only HTTP but also POP3/IMAP/SMTP and even UM Call Router.
https://1drv.ms/b/s!AnMGYHD9VK0hqJdEUhiN9kNHYC3bSg
I didn't push to the syslog and VRRP config, HAProxy have excellent appliances to play with that... :)
Good stuff Benoit, thanks for the link.
Deletehello zoltan,
ReplyDeleteI followed everything in the article but when I start the service I receive a lot of these errors
[ALERT] 015/170723 (1612) : parsing [/etc/haproxy/haproxy.cfg:111] : server ex02 only supports options 'backup', 'cookie', 'redir', 'observer', 'on-error', 'error-limit', 'check', 'disabled', 'track', 'id', 'inter', 'fastinter', 'downinter', 'rise', 'fall', 'addr', 'port', 'source', 'minconn', 'maxconn', 'maxqueue', 'slowstart' and 'weight'.
Hesham, it looks to me like you have a syntax error in your haproxy.conf file on line 111, specifically in the "server" statement. The options used in my lab are all supported by the "server" statement. For supported server options see https://cbonte.github.io/haproxy-dconv/configuration-1.5.html#5.2.
DeletePlease review your haproxy.conf file and check for any typos.
Hello Zoltan,
Deletemy mistake, the version that i installed (1.4) doesn't support the parameters in your article, worked like a charm after upgrading.
thanks for your help
Good stuff Hesham, glad it works. Hope you'll find it useful :-)
Deleteis it okay for backend when i replace with cerificate public? where .pfx is converted to .pem so I do not have to run the command c_rehas just change the existing directory path dibackend be / etc / ssl / cert / exchange_certificate_and_key_nopassword
ReplyDeleteNeed advice.
Many thx.
Hi Zoltan,
ReplyDeleteis it okay for backend when i replace with cerificate public? where .pfx is converted to .pem so I do not have to run the command c_rehas just change the existing directory path backend to /etc/ssl/cert/exchange_certificate_and_key_nopassword.pem because the certificate I bought through comodo provider (wildcard) is bundled with intermediate.
Need advice
Many thx