Highly Available L7 Load Balancing for Exchange 2013 with HAProxy – Part 1 - Introduction and lab description
Highly Available L7 Load Balancing for Exchange 2013 with HAProxy – Part 2 - Deploy and configure the PKI infrastructure
Highly Available L7 Load Balancing for Exchange 2013 with HAProxy – Part 3 - Configure and test the Exchange 2013 Client Access role
Highly Available L7 Load Balancing for Exchange 2013 with HAProxy – Part 4 - Install CentOS 7
Highly Available L7 Load Balancing for Exchange 2013 with HAProxy – Part 5 - Install and configure HAProxy
Highly Available L7 Load Balancing for Exchange 2013 with HAProxy – Part 6 - Make HAProxy highly availabile
Highly Available L7 Load Balancing for Exchange 2013 with HAProxy – Part 7 - Demo (this page)
We reached the final stage of our journey. In this last part we'll explore some of the features that the solution can offer. It is structured as follows:
- Initial tests and basic stats troubleshooting
- Service level load balancing
- Service level failure handling
- HAProxy failure handling
- Stuff to be aware of
- Final thoughts
Initial Tests and Basic Stats Troubleshooting
We start the demo by creating an Outlook profile. Our only test account in this lab is Administrator, and as I mentioned earlier, it doesn't concern me for the purpose of this lab.
The expectation is that the settings are retrieved by means of the Autodiscover service and the profile is created with minimal effort. Let's rock and roll.
In Control Panel / Mail, we click Add to create a new profile:
Type a name for the profile:
Type a user name, e-mail address and password:
When prompted, type the credentials for LAB\Administrator. It is a workgroup computer, so this is the expected behaviour. On a domain joined workstation we wouldn't have to authenticate. Remember to tick the box to remember the password to minimise inconvenience.
We get the green tick for all stages. Looking good so far. Click Finish.
And we have our profile created.
We fire up Outlook. It opens nicely and logs us in to the mailbox. I already have some content there from previous tests - remember, in Part 6 we configured e-mail notifications for HAProxy HA events in keepalived.
Now we do a "Test E-mail Autoconfiguration" (Ctrl + RighClick on the Outlook icon in the notification bar), to confirm that we've got all the configuration in good order.
Finally we confirm that Outlook is connected as expected, using the right protocol. We have Outlook 2013 SP1 connecting to an Exchange 2013 SP1 server that's enabled for MAPI-HTTP, therefore Outlook will attempt to connect first, by default, via MAPI-HTTP. The following screenshot confirms that we are indeed connected via MAPI-HTTP. For more on MAPI-HTTP and on how to check whether it is indeed used, see
this Microsoft Exchange Team blog.
By now we should see some stats in HAProxy. We now access the HAProxy stats page, which in this lab is accessible via https://mail.digitalbrain.com.au/stats. Please remember:
- There are two HAProxy servers in a HA configuration (provided you followed everything in this blog to the letter).
- mail.digitalbrain.com.au points to the VIP associated with the HA pair of our HAProxy servers.
- We will be connected to the HAProxy server holding the VIP, therefore the stats will represent traffic seen by that HAProxy server only. It is NOT a combined view of both servers.
With all the work so far, including the profile creation, launching Outlook, and performing all the connectivity tests, we should see some load-balanced traffic for Autodiscover and MAPI-HTTP. Here is what we get:
Huston, we have a problem! My Outlook profile was clearly configured by means of Autodiscover, yet there is no Autodiscover traffic:
On the bright side, we have MAPI-HTTP traffic, and stats show that it is load-balanced between the two CAS servers:
So what is going on?
Well, if look at the very bottom section of the stats, be_ex2013, we see something going on there. If we go back to
Part 5 and analyse the haproxy.conf file, we'll understand that this section acts like a "catch-all" for all traffic that doesn't match the ACLs defined in the "frontend" section, and it is defined there as "default_backend be_ex2013":
Looking at the IIS logs on the CAS servers we do see autodiscover traffic, and here is the catch: we defined our HAProxy ACL as
Autodiscover...,
...yet in the IIS log we see
autodiscover:
Outlook is posting requests in lower case! And yes, HAProxy ACLs are CaSE sENsiTIve. The case sensitivity of ACLs is documented in the official HAProxy documentation, but it is easy miss it, so I thought I'll bring it out with an example. Mystery solved.
All we have to do to fix it is to add another ACL with the correct capitalization. We don't want to delete the original line because there might be some clients/applications which send requests with a capital "A".
We need to update the haproxy.conf file on both HAProxy servers and restart the haproxy service:
systemctl restart haproxy.service
Following that I removed and recreated the Outlook profile, opened Outlook and did the tests again, for the sake of generating some traffic that I can see in the stats and to make sure that I can clearly differentiate it from previous tests.
IMPORTANT: Please be aware that restarting the HAProxy service will also reset the stats. They are not preserved between restarts.
So, after another round of Outlook profile creation and testing, we can happily confirm that our Autodiscover service is load balanced and it is correctly recorded in the right section of the stats:
Here we go, we now know where to look and how to fix reporting if we don't see what we expect. There are other ways to work out the correct capitalization - we can look at HAProxy logs, as well as at the URLs configured in Exchange - whatever works for you.
Service Level Load Balancing
It is time now to check how our other services are load balanced.
Testing MAPI-over-HTTP
We've already checked MAPI-HTTP and confirmed it is working, so no point doing it again.
Testing RPC-over-HTTP (Outlook Anywhere)
Our test computer has Office 2013
SP1, therefore by default it will connect via MAPI-HTTP. We can force it to use RPC-over-HTTP:
- On the workstation, open Regedit.exe.
- Navigate to HKCU\Software\Microsoft\Exchange
- Create the MapiHttpDisabled entry with a DWORD value of 1.
It is documented at
http://blogs.technet.com/b/exchange/archive/2014/05/09/outlook-connectivity-with-mapi-over-http.aspx.
Recreate the Outlook profile, or create a new one. Open Outlook and check the connection status: it uses RPC-over-HTTP indeed.
In order to generate some traffic we click on a couple of e-mails, open them, and send some to ourselves. Then we check the stats: our RPC-over-HTTP traffic is correctly identified and load balanced.
Testing Outlook Web App
We open Internet Explorer on LAB-WS01 and browse to https://mail.digitalbrain.com.au/owa. We can see that there are a couple of e-mail there.
Again, to create some traffic, we poke around the mailbox, then we check the stats. OWA traffic is correctly identified and load balanced:
Testing Exchange Admin Center
The process is similar to that of testing OWA: we browse to https://mail.digitalbrain.com.au/ecp, and click a few controls around the interface.
Then we confirm that our EAC (a.k.a. ECP) traffic is load-balanced:
Testing Exchange ActiveSync
This bit is a tad tricky due to the fact that I cannot access my lab from a proper smart phone, and therefore I had to use an emulator. Ideally you'd use a real smart phone or tablet, but if you are in the same boat as I, then get the
Windows Phone SDK. Please bear in mind that you should use a physical machine with virtualization features enabled in the BIOS. Setting it up is beyond the scope of this article, I'll let you work it out.
An EAS client is no different from a computer: in order to communicate with a secure web site, it must trust it. In my lab I use in-house CAs, therefore the smart phone wouldn't trust my Exchange servers. We have to load our root and intermediate CAs' certificates into the phone's certificate store. There are a number of ways to do it and it is documented in this
MSDN article. I chose the first option, installing the certificates via Internet Explorer. I used LAB-EX01 to make the certificates available, and here is how:
- On LAB-EX01 I created a new web site and called it "Certificates" - you can call it anything you like:
- We specify the path to the site's files as C:\Temp. This is where my root and intermediate certificates were stored when we built the environment.
- Type .cer as the file name extension and set the MIME type to text/plain:
- Then we create a pin-point DNS zone called cert.digitalbrain.com.au, pointing it to the LAB-EX01 server's IP address, 10.30.1.11. For a refresher on my DNS setup see Part 3.
- On the phone, open Internet Explorer and browse to http://cert.digitalbrain.com.au. The emulator is a bit small...
- Click "RootCA.cer". When prompted, tap "Open":
- Tap "Back" to go back to the certificates page:
Repeat the process for the intermediate CA's certificate, LAB-CA02.lab.local_lab-LAB-CA02-CA.cer.
Before configuring Exchange ActiveSync, we can test whether the certificates work by browsing to the OWA page. There are two things that indicate that we are on the right track:
- We are taken into the mailbox with no certificate warnings.
- The secure OWA website has a padlock, showing that the site is secure.
We are now ready to set up EAS and test. Back on the home screen, tap on the envelope icon:
Tap Exchange:
Type the administrator's e-mail address and password, then tap "Sign In":
The account is added with no further interaction. Tap "Done".
Opening the EAS client, we are taken to our Inbox:
At this point we have an EAS client configured, some e-mails in the Inbox, and we should see them in the EAS client. However Administrator is a member of a number of
protected groups and as such default AdminSDHolder security prevents it from using Exchange ActiveSync. As a result our emulated Windows Phone will not show us anything. We can see this in the IIS logs on the Exchange servers:
Since I can't use EAS with Administrator, I created a regular, test user just to test EAS load balancing. Removed the connection to the Administrator mailbox, created one for the test user, and sent a couple of test e-mails. Lo and behold: my emulated EAS client has downloaded all my test emails!
Checking the stats, we bump into the same issue as with MAPI-HTTP: no traffic is shown for EAS. The reason is the same: wrong capitalization in the ACL of the URL in the haproxy.conf file. Here is the original (and incorrect) content:
Checking the IIS logs (see above), we can work out the correct capitalization and add an additional ACL, or edit the existing one. I chose to add a second line:
Remember:
- Make the change on both HAProxy servers.
- Restart the HAProxy service on both servers.
Once we updated haproxy.conf and restarted HAProxy, we send some e-mails to the test user and sync it with the EAS client. Checking the stats again confirms that this time it works like a charm:
Testing EWS and OAB
EWS provides
key functionality for Outlook. Outlook also downloads the Offline Address Book via HTTPS. Simply launching and using Outlook will inevitably generate traffic to these services. Our MAPI-over-HTTP and RPC-over-HTTP tests so far would have inevitably generated some traffic. Checking the stats confirms that they are correctly identified and are load balanced:
Other Traffic
Anything that doesn't match the ACLs defined in the haproxy.conf file will be handled by the default, catch-all backend definition. Traffic will be load balanced based on host availability, but not bound to any specific service. If our ACLs are correctly configured, then we shouldn't see anything here (or negligible traffic for irrelevant content). From previous tests and failures however, we do see some residual traffic:
If we still see stuff being handled by this section and we are concerned about it, we can check the HAProxy logs to identify what they are, with the following command:
grep 'fe_ex2013~ be_ex2013/lab-ex*' /var/log/haproxy.log
The output will reveal the requests which were handled by the default, catch-all definition. Update the ACLs as or if required. In our case we've got it right and there is nothing to worry about:
Service Level Failure Handling
Now we want to test the core of this series of articles: what happens if a single service becomes unavailable, while everything else keeps working?
We'll set two components to an inactive state:
- RpcProxy on LAB-EX01 - remember, we forced Outlook to use RPC-over-HTTP, which is still in place
- EwsProxy on LAB-EX02 - Outlook uses EWS for a number of functions
We'll then reset the stats by restarting the HAProxy service on both servers, and we'll launch Outlook.
First, we set the state of RpcProxy on LAB-EX01, and EwsProxy on LAB-EX02, to Inactive:
Set-ServerComponentState LAB-EX02 -Component RpcProxy -Requester Maintenance -State Inactive
Set-ServerComponentState LAB-EX01 -Component EwsProxy -Requester Maintenance -State Inactive
Next we restart HAProxy on both servers:
systemctl restart haproxy.service
Then we launch Outlook and generate some activity:
- Open a couple of emails.
- Open the calendar.
- Download the offline address book.
- Anything else you might want to do to get the bytes flowing.
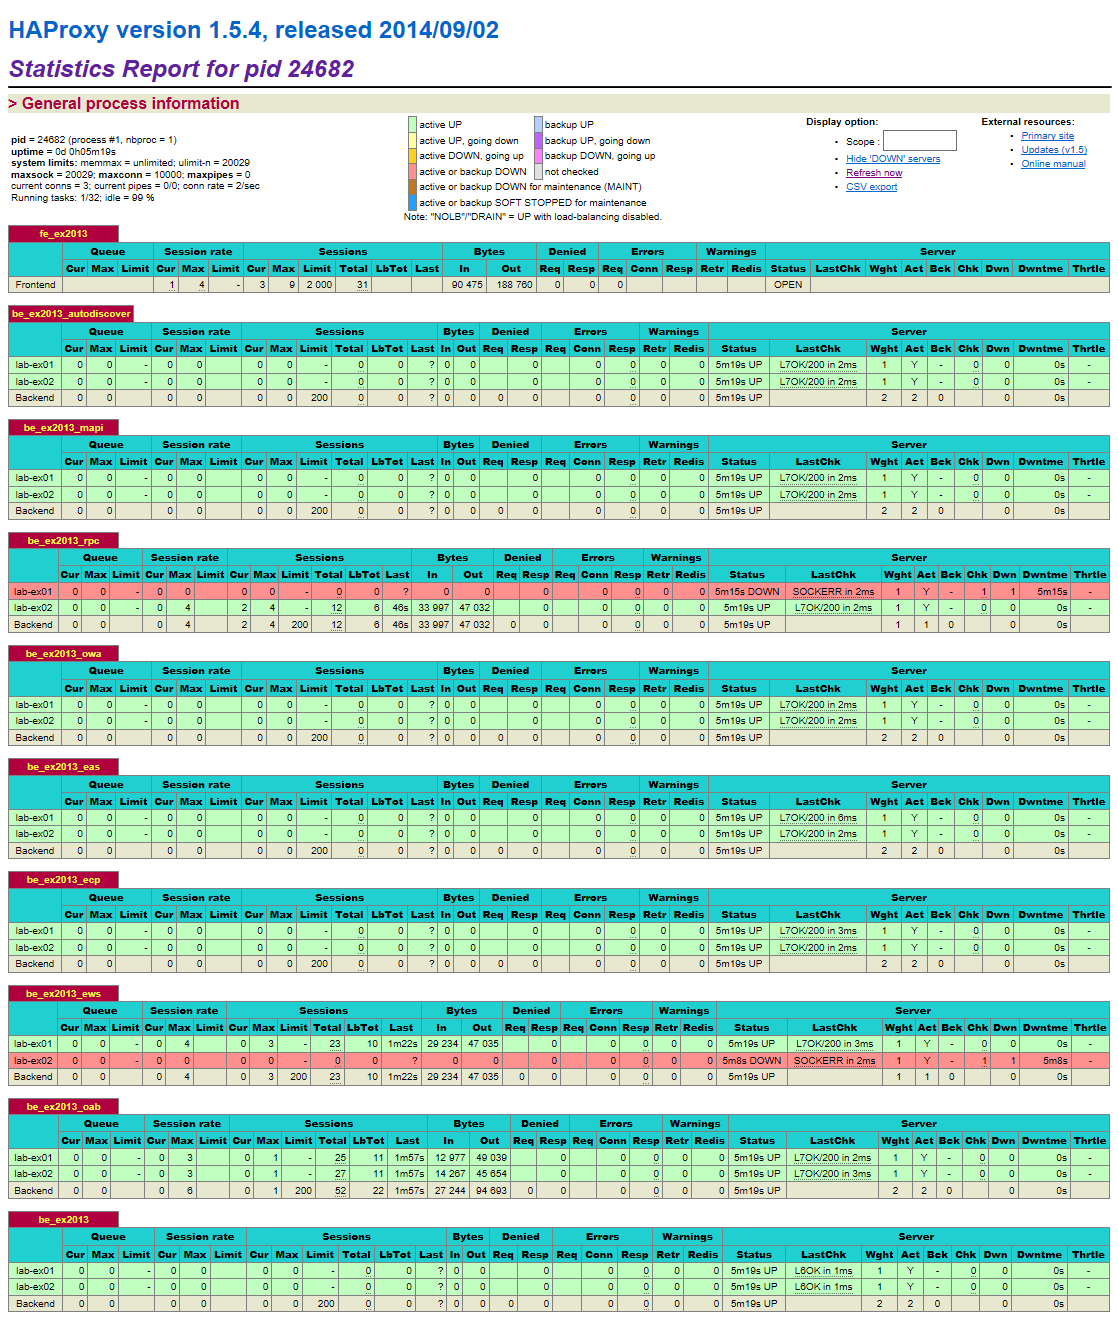
Finally we check the stats:
The stats have a number of noteworthy features:
- There is traffic on the be_ex2013_rpc service. Outlook indeed uses RPC-over-HTTP - our registry hack to force it to use RPC-over-HTTP is still in place.
- The RpcProxy service isn't responding on LAB-EX01 - note the red stripe across it and no traffic at all in the be_ex2013_rpc section.
- All RPC-over-HTTPS traffic has been directed to LAB-EX02.
- The EwsProxy service isn't responding on LAB-EX02 - note the red stripe across it and no traffic at all in the be_ex2013_ews section.
- All EWS traffic has been directed to LAB-EX01.
- The OabProxy service is active and working well on both Exchange servers and OAB traffic is load-balanced across them - note the stats in the be-ex2013_oab section.
Now we re-activate the disabled services, "fixing" the fault or taking servers out of maintenance and putting them back into production, say, after patching. Then we poke around in Outlook to generate some action, and will check the stats again.
Re-activating disabled services:
Set-ServerComponentState LAB-EX02 -Component RpcProxy -Requester Maintenance -State Active
Set-ServerComponentState LAB-EX01 -Component EwsProxy -Requester Maintenance -State Active
This time we don't reset the HAProxy stats because we want to confirm that after service recovery traffic is re-distributed again on the fly. Here are the new stats:
Please note the following features:
- No more red stripes, all services are back online.
- Traffic is now being load-balanced.
- A disproportionate amount of traffic can be observed between servers within the RPC and EWS services due to the earlier service "fault" while only one server out of two serviced the affected services.
- We didn't have to do anything in HAProxy: it detected the resurrected services and started using them on the fly.
All along this test the Outlook user experience was flawless, continuous, responsive and reliable.
We've successfully tested the essence of this lab: we load-balanced client traffic at Layer 7 service level, making smart load balancing decisions based on individual service (un)availability within an Exchange CAS server, and provided uninterrupted and seamless user experience. We can report no service disruption and ask for a bonus.
HAProxy Failure Handling
So far we tested how HAProxy handles failures of Exchange services. It assumed a working HAProxy server. But what happens if HAProxy itself fails?
This section shows how keepalived, our high availability solution, keeps the load balancing service itself working.
The test is simple: faults don't warn us kindly, "Dear admin, be advised that your server will fail at 10:23PM this Saturday". So I simulate a real fault by switching off power to LAB-HAP01 and we'll watch the following:
- The VIP is transferred to the secondary node, LAB-HAP02.
- Roughly how long it takes for the failure to be detected and the VIP to be moved and become active.
- Administrative email notification is sent to LAB\Administrator. Remember, we configured keepalived email notifications to go to administrator@digitalbrain.com.au, see Part 6.
Confirming that LAB-HAP01 is holding the VIP and both load balancers are online:
I set up two PING sessions: one for LAB-HAP01 (10.30.1.13), and the other for the VIP (10.30.1.15). Whilst the PINGs are in progress, I switched off power to LAB-HAP01. Pings showed that LAB-HAP01 went offline, and the VIP flicked over to LAB-HAP02. Only one ping was lost, so that's pretty good.
Looking at the logs on LAB-HAP02, we confirm that it is now the MASTER node in the HAProxy cluster:
Remember, we configured email keepalived notifications, so we should see some coming in. Here it is, confirming the same:
And in case someone needs more facts, we can always check the IP addresses bound to LAB-HAP02's NIC:
During all this time load balancing and Outlook connectivity was maintained - that's how I could see the incoming e-mail notification from LAB-HAP02. Mind you, this might be only by accident as I have not implemented any mechanisms in my lab to share and maintain client stickiness information across the two load balancers. Nevertheless, it shows that if after a failure the new master connects me to the same CAS server (remember, I still use RPC-over-HTTP), my connection will keep working. Your experience might be different unless client stickiness data sharing is enabled, or if you switched back to using MAPI-over-HTTP. For more details see the
"Stuff to Be Aware Of" section below.
Now we "fix" the failed master node and watch the service fail back. This is what happens:
- LAB-HAP01 comes back online and it detects that it isn't the MASTER.
- LAB-HAP01 determines that it has a higher priority than LAB-HAP01 - see the "priority" values in the keepalived.conf files of the two hosts. LAB-HAP01 therefore assumes the MASTER role.
- LAB-HAP02 acknowledges the takeover and it enters the BACKUP state.
Stuff To Be Aware Of
Technically we completed our lab build and testing and we could potentially leave it here. However a couple of closing thoughts are in order.
Is the solution perfect? No, it isn't.
Can it be optimised? Yes, it can.
Here are some quick points.
ACL Case Sensitivity
From the tests above we've learned that ACLs are case sensitive. In our lab we used the
url_beg directive to match the beginning of the various Exchange 2013 URLs with specific patterns. We saw that /Autodiscover and /autodiscover are treated as distinctive strings.
We created entries for various capitalization options and that fixed our issue.
Another, better way to achieve the same is to use case insensitive matches. We could replace the
url_beg directive with
url_reg to do a case insensitive regexp string match. Our ACLs would change as follows:
acl autodiscover url_reg (?i)\/autodiscover
acl mapi url_reg (?i)\/mapi
acl rpc url_reg (?i)\/rpc
acl owa url_reg (?i)\/owa
acl eas url_reg (?i)\/microsoft-server-activesync
acl ecp url_reg (?i)\/ecp
acl ews url_reg (?i)\/ews
acl oab url_reg (?i)\/oab
However we must be mindful of the performance impact that regexp matching might have in a large environment or on undersized load balancers.
HAProxy Service Failures and Client Stickiness
The purpose of keepalived in our lab is to activate the backup load balancer should the master fail. However the slave will be unaware of which client was connected to which Exchange server. Therefore if the master fails, there will likely be lots of angry users, re-connected to the wrong CAS server, and the helpdesk phones will ring like crazy. Please bear in mind though that this is only an issue if using RPC-over-HTTP. It is unlikely to happen if using MAPI-over-HTTP, because
the CAS role becomes a light-weight, stateless HTTP proxy which no longer requires client stickiness.
Ideally stickiness information should be maintained across load balancers, so that clients will be seamlessly reconnected to the correct server, regardless of which load balancer is servicing their sessions.
HAProxy provides the mechanism to alleviate this situation, however we have not implemented it in our lab. See
this blog for more details, as well as the
"3.5. Peers" section in the
HAProxy documentation.
In real life you should synchronise server stick tables or use source IP hashes in order to reconnect clients to the correct CAS servers.
Stats Don't Survive Reboots and Aren't Cumulative, Nor Aggregated Across Hosts
HAProxy stats are reset every time the service is (re)started.
Each HAProxy host maintains its own set of stats. When we view the stats page, what we see are the values of the load balancer that holds the MASTER role at the time, since its last service (re)start. Also there is no event correlation as stats are point-in-time values which are meaningless without context.
During my research I've come across
Datadog who claims to overcome this issue by archiving HAProxy logs and correlating/aggregating them. I haven't tested it, have no affiliation, nor any interest in Datadog, so don't hold me responsible if it doesn't work out for you.
Final Thoughts
In this series of articles we built a solution using completely free and open source tools. The only cost would be the time of the individual building it. It is a potential low-cost alternative to more expensive commercial solutions, provided that the skills to build, support and maintain it are available, and its limitations are accepted.
For the sake of completeness I need to warn everyone who contemplates implementing it into production that you'll need to consider company policy and strategy. Some of the concerns I can quickly think of:
Is open source allowed in the organization? - I've seen places where open source was banned outright for various reasons.
Is support continuity a concern? - Some organizations are very good at making Windows and appliance-type gear work, but they have a massive lack of in-house Linux skills. You'd agree by now that some degree of Linux knowledge is required to build and maintain such a solution. If something breaks, will you have the resources to fix it? Can you survive on community support only?
Other concerns? - There may be others that escape me right now.
Well, this is it. I hope you enjoyed it and found it useful as well as informative, and thank you for bearing with me.
Highly Available L7 Load Balancing for Exchange 2013 with HAProxy – Part 1 - Introduction and lab description
Highly Available L7 Load Balancing for Exchange 2013 with HAProxy – Part 2 - Deploy and configure the PKI infrastructure
Highly Available L7 Load Balancing for Exchange 2013 with HAProxy – Part 3 - Configure and test the Exchange 2013 Client Access role
Highly Available L7 Load Balancing for Exchange 2013 with HAProxy – Part 4 - Install CentOS 7
Highly Available L7 Load Balancing for Exchange 2013 with HAProxy – Part 5 - Install and configure HAProxy
Highly Available L7 Load Balancing for Exchange 2013 with HAProxy – Part 6 - Make HAProxy highly availabile
Highly Available L7 Load Balancing for Exchange 2013 with HAProxy – Part 7 - Demo (this page)